In response to a couple of questions I've received recently, I thought I would post a quick tutorial to show how easy it is to assemble an adventure map from my Patreon dungeon tiles.
Obviously, if you're already familiar with any of the major image editing programs, then this article will be of little use - but if you've never done anything like this before, then keep on reading...
OK, still here?
Right then - the first thing you'll need to do is download GIMP (it's a free image editing program), as that is what I'll be using throughout this tutorial. I'll also be assuming that you've downloaded all of the tiles you plan on using (though feel free to download the entire set ;) ) onto your hard drive.
So, assuming you've done all that, we're ready to go ...so lets begin.
Open up GIMP
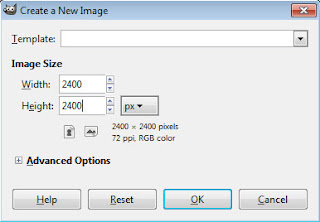
Select FILE > NEW
In the dialogue box that appears enter values that are multiples of 600 (as each of my 12x12 tiles are 600 x 600 pixels in size) ...so in this example I'll go with 2400 x 2400 (which is enough space for 4 tiles high and 4 tiles wide).
Then select VIEW > SHOW GRID (also make sure the 'snap to grid' option is checked).
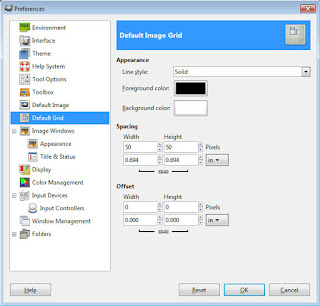
Then select EDIT > PREFERENCES
In the dialogue box that appears select DEFAULT GRID and then enter values of '50' pixels in the WIDTH and HEIGHT boxes (this is because each grid square of my maps measures 50x50 pixels).
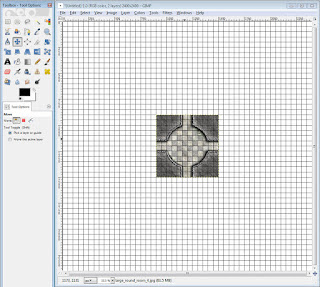
Your image should now look like this (note that these grid lines are invisible, and they'll not appear in your saved or printed image):
Then choose FILE > OPEN AS LAYERS and locate the tile that you want to use (i.e. one that you've already saved to your hard drive) .
This will import the tile as it's own layer (think of this layer as a post-it note on top of your blank canvas) ...and you can move it into the position you like with the move tool (i.e. the highlighted icon in the toolbar).
Then do the same FILE > OPEN AS LAYERS for any additional tiles, and position them accordingly (and if you have the 'snap to grid' option enabled that I mentioned previously, the tiles should snap to the nearest square - which makes lining them up super easy).
You should also note that every time you insert a new tile, it also gets added to the layers window on the right ...so if you want to move a specific tile around you'll first need to select it here (which makes it the active layer) - and you can then drag it around in the usual fashion (i.e. with the move tool)
Then, if you want to save the file for further manipulation later, save it in the normal fashion (i.e. GIMP's own .xcf format), and that will keep all the layers (i.e. the map tiles) separate for further tinkering at a later date.
However, if you want to use the whole map in a VTT of some description (or just save it as an image file) then select EXPORT AS.
By default it might be set to export as a .png file, but you can change that to any other file format via the options in the bottom right corner of the dialogue box (I personally suggest saving it as a JPEG ...as the image will still look fine - but the file size will be much smaller).
And that should result in an image like this...
...which you can then load into your VTT of choice!


No comments:
Post a Comment